Participating in Microsoft Teams Meetings
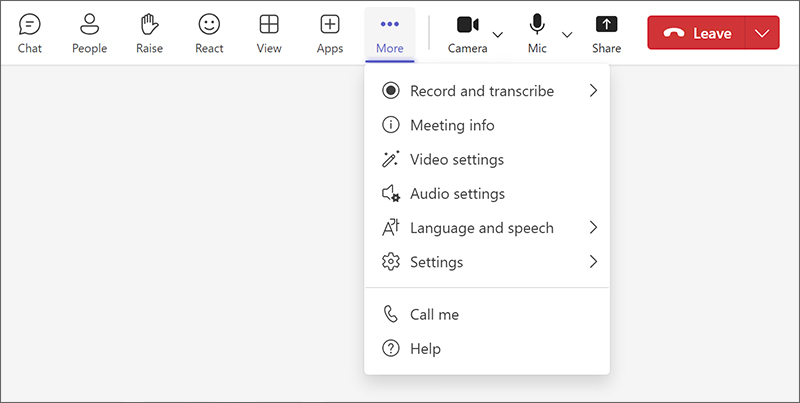
After joining an online meeting in Microsoft Teams, familiarize yourself with the Teams meeting controls toolbar.

Using the Teams Meeting Controls Toolbar
- To reveal the chat column, click or tap the Chat icon. View replies and enter text in the chat column on the right. Note that this is group chat for all participants to see.
- Click or tap the People icon to reveal a list of meeting participants.
- Have something to say? Let the instructor or meeting organizer know by clicking or tapping the Raise hand icon. Alerts for raised hands appear as notification prompts to the organizer. Raised hands also appear in the participant list — when shown as a right panel by selecting the People icon.
- The React icon shares your reactions — Like, Love, Applause, Laugh, and Surprise — with meeting participants.
- To modify the participant video feeds you see, select the View icon.
-
Gallery view allows you to see attendees in a grid.
-
Speaker view displays the active speaker in the meeting.
-
Together mode places participants into a virtual scene, such as an auditorium, amphitheater, or conference room. Selecting a scene changes the view for everyone in the meeting.
-
Large Gallery appears as an option for larger meetings, allowing a 7-by-7 grid with up to 49 video feeds.
-
Focus on content becomes an option during content sharing, hiding people's video feeds.
-
Select max gallery size lets you choose from 4, 9, 16, or 49 video feeds.
-
Prioritize video changes the Gallery view to show more participants with active cameras.
-
More options menu includes show gallery at top or show gallery on the right, turn off/turn on incoming video, hide me/unhide me, and remove me from gallery/include me in gallery.
- The Apps icon lets meeting organizers and presenters add collaboration and productivity apps to the meeting.
- The More/three-dots icon yields a drop-down menu of meeting actions and settings. For example, if you're using the Teams desktop software or mobile apps, you can turn on real-time closed captioning.
- Click or tap to the More/three-dots icon. A drop-down menu appears.
- Select Language and speech > Turn on live captions.
- Teams prompts you to identify the spoken language. "English (US)" is the default.
- Select a language and click or tap the Confirm button.
- Once activated, the closed captioning will only appear for you.
- The Camera icon switches your camera on and off.
- You may be using the Mic icon the most. If you are not speaking, consider muting your microphone. Click or tap the Mic icon to mute and, before speaking, select again to unmute. Or use the temporary-unmute keyboard shortcut.
- The Share icon allows you to share content, such as screen sharing your whole desktop or a single window.
- When a participant shares content in the meeting, use the Pop Out icon — not pictured above — to display the content in its own Teams meeting window.
- To exit the meeting, click or tap the Leave icon.
Customize Participant Video Feeds
Use the three-dots menu icon on anyone's video feed, including your own, to change the Teams meeting video experience.
Pin Someone's Video
Teams prioritizes video feeds of participants who are speaking. You can keep a video feed in view — just for you and regardless if the person is talking or silent — by pinning the video. Choose a video feed and then select the three-dots menu icon on the feed. A drop-down menu appears. Select Pin for me.
Pin Your Own Video
You can set your video feed to always appear for you. On your video feed, select the three-dots menu icon. A drop-down menu appears. Select Pin for me.
Spotlight a Video
This setting pins a video feed for everyone in the meeting.
- If you're a meeting organizer or presenter, choose a video feed to spotlight, including your own.
- Select the three-dots menu icon.
- A drop-down menu appears. Select Spotlight for everyone.
- Teams prompts you to confirm "You'll highlight this video for everyone in the meeting."
- Click or tap the Spotlight for everyone button.